Suggestions

Top Results

Welcome to Your MSA12X

A Guided Walkthrough from Design to Configuration

Congratulations on the purchase of your new Bose Professional MSA12X Powered Beam-Steering Array loudspeaker.

This page is meant to serve you as a getting-started point. Simply progress through each section to deploy your MSA12X system.

We start with a review of the MSA Design Tool and how it can be used to provide optimal coverage to your audience areas. That’s followed by an unboxing of the MSA12X and a review of what is included. Next, essential pre-installation steps are provided to reduce time spent on-site. When you’re ready to assemble and mount your arrays, we’ve got you covered with best practices for mounting and installation, and we end with how ControlSpace Designer can be utilized to dial in your configuration.

Thank you for choosing the MSA12X.

DESIGN

MSA Design Tool

Create custom-fit designs in less time. MSA Design Tool software helps AV system designers produce precise MSA12X sound system designs quickly. The Array Tool features an intuitive interface and familiar workflow, so it requires minimal training. Using the direct-field calculation engine, you can quickly trial different MSA12X configurations, placements, and coverage formations to best match the needs of the venue.

DOWNLOAD

Design Guide

If you require an offline resource to aid you in the design and deployment of your MSA12X system, please download this helpful guide, otherwise, you can continue down this page to get you up and running.

DOWNLOAD

Provided below is an example of how the MSA Design Tool can be used to model a venue and optimize the coverage of MSA12X arrays. In this example, a pair (L/R) of 2-module arrays are configured to provide coverage to the main floor and balcony of an auditorium for speech applications.

Step 1: Launch the MSA Design Tool and define your project settings. Click Continue when you are ready to proceed.

Note: The Default Ear Height is set to 1 m (3.28 ft) which is suitable for a seated audience. This value can be later modified in your venue model.

Next, create a 2D model of the acoustic space where your MSA12X modules will be installed. This is accomplished either by using measurements gathered from site plans such as plan and elevation views or by taking measurements at the site itself. In this example, three surfaces will be modeled: the stage, main floor, and balcony.

Auditorium: elevation view

Auditorium: plan view

Step 2: By default, you begin with 1 surface. You may either enter values into the properties panel or use your mouse to adjust the points in Plan and Side Views.

Note: The Ear Height can be adjusted in the Properties Panel and is represented by a dashed line in the Side View. In this example, the stage is using an ear height of 1.75 m (5.74 ft).

Step 3: Double-click on the surface and give it an appropriate name. Press Enter after renaming the surface.

Step 4: Click the Add a New Surface button and repeat Steps 2 and 3. Repeat these steps until each area of the venue has been modeled.

Step 5: At this point, it’s a good idea to save your work. Ctrl-S will bring up your Save Project window.

Step 1: Click on the Speaker/Analysis tab, and click on the Add a New Loudspeaker button. Double-click the array to rename it. Press Enter after renaming the array.

Note: This system example will consist of a left and right array. After configuring the first array, Focus on optimizing the coverage for one array and then use standard keyboard shortcuts to copy and paste another array.

Step 2: Adjust the Array Position. You may either enter values into the Array Properties panel under the Array Position section or use your mouse to adjust the array in the Plan and Side Views.

Note: Z consists of a TopCenter, and Bottom coordinate. Top represents the Z coordinate at the top plate of the array in the venue, Center the array midpoint, and Bottom the Z coordinate of the bottom plate of the array. You only need to specify one of these values.

The pitch can be modeled for mounting the MSA12X on angled surfaces only. Its included mounting hardware does not support vertical angles, but an optional yaw bracket will allow you to securely position the array at ±6 degree increments between 12 and 90 degrees. If you intend to use the included yaw brackets, you may also specify the yaw angle here.

Step 3: Under the Array Configuration section, specify how many modules will be used in an array and select between Single or Dual beams. Dual beams are used in this example to provide coverage to both the main floor and balcony.

Note: Delay is available for time-aligning arrays relative to the position of other loudspeakers in the venue.

Step 4: Select the desired beam shape for both the Main and 2nd beams. If you are working with a single beam, you will only have one selection to make.

Note: In this example, a Steer/Spread or Raked Floor could be used for both the Main Floor and Balcony. Experiment to find what ultimately sounds the best for your venue.

Tip: Use your mouse wheel to zoom in or out in the Plan and Side Views. Hold Ctrl and left-click the mouse to pan.

A review of the beam shapes and their definitions are provided below:

Basic Steer/Spread is the most basic beam pattern. First, steer the axis of the beam vertically, then spread the beam from that axis. Steering and Spreading are independent from each other. If spreading is applied, the beam is spread symmetrically from the steer axis. When the Steer angle = 0 and the Spread angle = 0, the radiation pattern of the array is the same as that of a (passive) nonsteerable columnar array, such as the Panaray MA12EX loudspeaker. Steer/Spread works for the vertical plane only; horizontal steering/spreading is not supported. 

Vocal Range Smoothing Option – Basic Steer/Spread has an option called Vocal Range Smoothing. With this option enabled (ON), the tonal balance inside of the coverage becomes more consistent, and the sidelobes from the beam are suppressed. The beam shape also becomes smoother, specifically around the vocal range. The trade-off of using this option is that you lose a few dB of headroom.

Flat-Floor Optimized is a beam pattern that is optimized for flat floors. With this beam type, you can only steer the beam. Spreading is not available in this pattern. This beam type achieves consistent coverage from the front row to the back row of the room, specifically around the vocal range.

Keep in mind that this beam pattern works best when the array is mounted at a certain height: The bottom plate of the array should be mounted 0.3 to 0.8 m (1 to 2.5 feet) above the ear height of the audience. If the array is mounted higher than this, or the floor is raked, choose a different beam type.

Vocal Range Smoothing Option – The Flat-Floor Optimized beam pattern also has an option called Vocal Range Smoothing. With this option enabled, the tonal balance from front to back of the room becomes consistent around the vocal range, and the sidelobes from the beam are suppressed. Again, the trade‑off of this option is that you lose a few dB of headroom. This feature is ON by default and recommended for this beam type.

Raked-Floor Optimized is a beam pattern that is optimized for raked floors. The Raked-Floor Optimized beam type achieves a vertically-asymmetrical beam radiation, which is suitable for covering a raked floor, or covering a flat floor from a relatively high array position, such as when the bottom plate of the array is more than 1 m (3.3 feet) above the ear height of the audience.

This pattern does not offer the Vocal Range Smoothing option.

Dual Beam Mode provides two beams that can be radiated from an MSA12X array built from 1, 2 or 3 modules, with any beam pattern selected independently for each beam. You can also apply individual gain and Room EQ* for each beam.

Note: Dual Beam Mode is only available when using Dante® input.

Dual beams for the MSA12X is achieved by utilizing all the drivers of the array for both beams simultaneously. By utilizing all the available drivers, better low-frequency directivity control for both beams can be achieved. Other manufacturers may split their array into 2 smaller arrays (one on top of the other) to achieve dual beams, but at the cost of performance.

* Supported Bose ControlSpace processor with Dante card required to apply individual room EQ for each beam.

Step 5: Adjust the Beam Shape properties. Values may be entered into the Beam Shape Array Properties or you can use your mouse in the Side View to adjust the top and bottom throw lines using the handles as illustrated. Aim the beam at the dashed line (listener ear height) for each surface. In this example, the Main beam is first aimed at the main floor and then the 2nd beam is aimed at the balcony. 

Note: Depending on your venue, you may choose to use one of the other beam shape algorithms to begin.

By default, array gain is initially set at 0 dB, which is equivalent to 1 watt. Before moving on to view the SPL map, it is recommended to invoke the Set Max Gain function.

Step 6: With the array selected, press the Set Max Gain button. Notice how the Gain parameter under the Array Configuration changes.

The Sound Pressure Level (SPL) Map option visualizes direct field coverage in a venue for various array placement and beam shape configurations. Direct field coverage describes the direct path between the loudspeaker and the listener and does not include the effects of reflections or reverberation. SPL values in dB are mapped to a color scale on the right edge of the graphical views.

Step 7: Under the SPL Mode, change the resolution to High and disable Auto-adjust. 

High setting provides the finest resolution and smoothest color transitions for data in the SPL map. 

When Auto-adjust is set to On, the range of SPL values in graphical views, the range on the color scale and the lower and upper SPL values are automatically and continuously adjusted in response to any change in the range present in the data. Leaving this On can result in having to repeatedly change the Upper and Lower SPL values as you make adjustments to the array.

By default, the Upper and Lower SPL values are 112 dB and 80 dB respectively, and due to such a wide range, it can be difficult to interpret the SPL map. Better results are seen when the delta between the Upper and Lower limits is between 10 – 20 dB.

Step 8: You may adjust the color scale sliders by moving the handles or you can type in values into the Upper and Lower SPL fields. 

In some cases like this one, having overlapping areas can make it difficult to see what is happening on lower levels when looking at the Plan view.

Step 9: Click on the Venue tab, disable the Balcony view, and go back to the Speakers/Analysis tab. Make adjustments to the SPL properties panel as necessary. You can click in between the upper and lower sliders to adjust the overall range while maintaining the same delta.

In the plan view, the coverage for the entire venue is shown regardless of which array is selected. In the side view, only the coverage for the selected array is shown. If an array is not selected, side view coverage defaults to the center axis of the venue.

Step 10: Deselect the array to view coverage results at the center axis of the venue.

Step 11: When you are satisfied with the coverage of your first array, Ctrl-C/Ctrl-V to create and paste a copy. Rename the array and move it to its intended location.

Step 12: Click on the Recalculate button to view updated results. Make adjustments to the color scale as necessary. In this example, we can view the median value between the upper and lower range from the loudspeaker as 88 dB.

UNBOX

Discover what is included with your purchase of the MSA12X.

Step 1: Carefully cut open the box.

Step 2: Remove all package contents.  Inside you will find the following:

  • One (1) MSA12X loudspeaker module 
  • Two (2) wall/loudspeaker bracket sets
  • One (1) interconnect bracket 
  • One (1) yaw bracket 
  • Three (3) power interconnect cables (region-specific) 
  • One (1) power cable 
  • One (1) LVDS audio/control expansion cable (RJ-50) 
  • One (1) 3-pin Euroblock connector 
  • Eight (8) M6 flanged head bolts 
  • Four (4) flat washers 
  • Four (4) double-sided washer tape rings 
  • Four (4) M6 flanged nuts 
  • Twelve (12) zip ties 
  • Twelve (12) self-tapping screws 
  • One (1) Bose logo nameplate

Step 3: Remove each component from its plastic packaging.

PRE-INSTALL

Before installing the MSA12X, it is highly recommended that you connect to, update, and test loading beam shapes into the modules at your office. Expand the sections below for recommendations and step-by-step instructions.

Required Software

  • Array Tool
  • ControlSpace Designer
  • Dante Controller (www.audinate.com)

Networking

  • DHCP Server
  • Managed or unmanaged switch (consult your network administrator) Must have the option to disable EEE technology

Hand Tools

  • 10 mm sockets and socket wrenches
  • Torque wrench
  • Drill
  • Philips Screwdriver
  • Level
  • Pencil

We recommend using a router or DHCP server in the system which will simplify the initial setup process.

Step 1: Connect PC and all devices to the network. It is recommended that each MSA12X module is updated independently before assembling 2- or 3-module arrays.

Step 2: Set IP of PC to Obtain an IP address automatically (DHCP).

EX (Dante and CSN) and MSA12X IP addresses are DHCP-enabled by default.

Each device will then be dynamically updated with a new IP and subnet mask dictated by the router or DHCP server.

Step 3: Launch Dante Controller.

Make sure all Dante devices appear. The IP address and subnet mask assigned will be dependent upon your DHCP router/server configuration.

Step 4: Change IP of all the Dante devices to static. This is accomplished in Dante Controller in Device View -> Network config tab.

After entering the IP Address, click Apply and reboot the device.

A static IP address ensures that your devices are always reachable at the same network address and can make it easier to identify and manage devices. 

To update Dante firmware on MSA12X, follow these steps to prepare, and then update.

Note: Updating Dante firmware through Dante Updater requires an active Internet connection to enable validation of file integrity. Before updating the devices, make sure you are connected to the system, the devices are active, and the Dante Network Interface is properly configured within Dante Controller.

We recommend updating individual modules before creating 2 or 3-stack arrays with interconnects. We know this can be time-consuming, but we have found this workflow provides the best results.

Step 1: Confirm you can see your MSA12X module(s) in Dante Controller and click the Dante Updater icon or select View and Dante Updater to launch the Dante Updater application.

Step 2: Go to Advanced Settings and enable Allow Imported Firmware.

Note: An internet connection is required for this step.

Step 3: In the Dante Updater window, click the Library tab, and then expand the Imported Files section.

Note: In this example, an older MSA12X Dante firmware file has already been loaded. In the next step, a newer version will be imported.

Step 4: In the lower-right corner of the Imported Files section, click the Import Firmware button.

Step 5: In the window that appears, you can select your desired Dante firmware files. Either click and drag the files over to this window or click Select File and use the open-file window.

Locate the desired Dante firmware file and add it to the Imported Files.

Dante firmware files are stored in the application directory of your computer at C:\Program Files (x86)\Bose\ControlSpace 5.X\bin\Dante Firmware

Note: Dante firmware is updated regularly—use the version that is consistent with the ControlSpace Designer software version you are using for your design. Most users will need UltimoX firmware. Once the firmware is validated, it is added to the list of imported firmware files.

Step 6: Click the Home tab in the upper-left corner of the window. Expand the Imported Firmware Files section. As Dante Updater scans for devices, the devices that have been detected will appear in the list.

Step 7: Select the device(s) that you want to upgrade and click the Upgrade Selected Devices button.

Note: After the firmware update is complete, manually power-cycle the MSA12X device(s). Rebooting devices via Dante or serial communication will not complete the firmware update.

You will have to use a PC and Bose Professional ControlSpace Designer (CSD) software in order to setup your MSA12X.

Step 1: With the PC connected to the network, launch CSD.  A blank Project appears. 

The MSA12X module(s) for your array will show up in CSD Project View automatically as endpoints in project view.  This process can take between 5 seconds to a minute. You do not have to scan for devices, or ‘Go Online’ for CSD to find MSA12X arrays, which are Dante Endpoints.

An ESP, EX and other ControlSpace devices on your network that you scan may show up sooner than MSA12X arrays.

If changes have been made in Dante Controller and your MSA12X does not appear, close and re-open CSD.

Step 2: Once the device appears, go to the System menu and select Hardware Manager.

Tip: If the MSA12X does not appear, go to System and Enable Dante Control.

Step 3: Go to the Firmware Update tab and observe it is green/up-to-date.  If it is orange, update the firmware and reboot as needed. 

Note: If any errors occur during the MSA12X update, close CSD and re-open and observe firmware version and color. If it’s green, it’s on the latest version. 

After completing the firmware updates, it is recommended that you practice connecting your system and uploading the beams before installing on site. Taking the time to do this will minimize potential issues on site. 

Connect

You can configure a longer array by stacking multiple modules and connect the modules by an expansion cable. Up to a 3-module array is supported. The end connectors of an expansion cable are RJ-50 (cable supplied), which is different from the RJ-45 for Control/Dante® (Ethernet), although they look similar.

Take notice when setting up a multi-module array.

For a multi-module array, the Ethernet cable has to be inserted to the receptacle located at the end of the array (cannot be connected in the middle) and the module in which the Ethernet cable is inserted becomes the Leader module of the array automatically. Audio signal and control signal are passed to the follower module(s) via the RJ-50 expansion cable between the modules. You cannot insert the Ethernet cable into the modules other than the one mentioned above. The array does not work when you insert the Ethernet cable into the wrong modules.

The Leader module represents the entire array; the IP address of the Leader module applies to the entire array. i.e. a multi-module array is seen as a single device; it is just a long array with more drivers than a single-module array.

Step 1: Prepare your workspace to connect the power interconnect and LVDS audio/control expansion cables.

Step 2: Connect your power and power interconnect cables, but do not yet connect to external power. In this example, the bottom module is the leader module. 

Step 3: Connect the leader module to your network switch and connect the included LVDS audio/control expansion cable to the expansion ports between the modules. You may connect the leader module to external power at this time.

Initial Configuration

Step 1: Connect the PC to the network and launch CSD. A blank Project appears. MSA12X is a Dante device, and it is recognized and controlled by CSD even without the CSD Network Scan or CSD Go Online.

If an MSA12X device block does not appear, Go to System > Enable Dante Control. 

Make sure the PC and MSA12X array(s) are both connected to the network.

Make sure the IP address for both the PC and the MSA12X array(s) are set properly to exist on the same network.

Step 2: It is highly recommended to enable Endpoint Control prior to the following operations. When Endpoint Control is disabled, Dante endpoints (including MSA12X) are under the control of the firmware of ControlSpace processor (EX or ESP) and you cannot program MSA12X controls from CSD. If Endpoint Control is disabled, many of the controls of the MSA12X control panel will be grayed out and a warning message will be indicated. Endpoint Control is disabled by default.

To enable Endpoint Control, go to System > Enable Endpoint Control.

Step 3: The next step is to identify which MSA12X device block represents which physical array on the network. There are two ways you can do this:

(Not illustrated) Double-click the device block and open the MSA12X control panel. Click the Identify button at tthe bottom of Hardware configurations section. An LED at the back of the physical array flashes and you can identify the device block.

(Illustrated) If you cannot access the back of the array to see the LED, another option is to click the Advanced… button and use the Audio Check mode. With the ‘Internal’ option, an internal signal generator feeds a 1 kHz signal to the array and the array can be identified by that sound.

Note: While in the MSA12X Advanced window, you may specify where you intend locate the array controls – either at the Bottom or Top of the array. In this example, the control are left in the Bottom location.

Whether you are installing a 1-, 2-, or 3-module array, you will need to specify where power and control will be connected, either at the bottom (default orientation) or at the top. If this step is overlooked, the beam could point toward the ceiling.

Step 4: Once you identify the array, rename the device, such as ‘Left-Array, ‘Right-Array. This is the device name used for Dante® routing later. The device name can be the same as the Array name already defined in Array Tool, or they can be different.

Step 5: With the arrays identified, it is recommended that you physically label each module since you will need to disassemble the array and reassemble on site before mounting. This can be accomplished with a small sticker applied to the back and using abbreviations such as “LT” for left top, “LB” for left bottom, and so on. 

At this point, you may test send the beam settings from Bose Professional Array Tool to the arrays in ControlSpace Designer. Please refer to Configure section below, Send Beam Settings.

CABLE & MOUNT

The MSA12X can be installed by one or multiple installers. The multiple installer method requires building arrays on the ground and attaching the entire assembly to the mounted wall bracket.  

Best results are observed when using multiple (2-3) installers, so that is what this section will focus on. For instructions on the single installer method, please refer to the MSA12X installation guide.

CAUTION

  • Each MSA12X module weighs 14.5 kg (32 lbs). Use caution when lifting to avoid injury and/or damage to the loudspeaker.
  • DO NOT place the MSA12X resting on its grille.
  • When installing the MSA12X in an alcove, leave a minimum of 0.3m (1 ft) clearance on the top and bottom of the array. 

Step 1: Install the wall bracket on the wall where the top of the array will be located, using wall mounting screws (not included). Tighten securely. Bracket must be horizontally level. Be sure to leave sufficient clearance from the ceiling for the top of the array.

CAUTION: Choose a position and mounting surface that is capable of supporting the total weight of the system. Bose recommends a safety factor of 10:1.

Step 2: For single module: Attach loudspeaker brackets to each end of the loudspeaker module, using the included flanged head bolts. Tighten bolts to 6.78 N-m (5 ft-lbs).

For 2- or 3- module array: Assemble complete array on the ground. Attach one loudspeaker bracket to the bottom loudspeaker module, and one loudspeaker bracket to the top loudspeaker module, using the included flanged head bolts. Attach one interconnect bracket between each pair of loudspeaker modules, using the included flanged head bolts. Tighten all bolts to 6.78 N-m (5 ft-lbs).

Step 3: Thread a flanged head bolt into one side of the loudspeaker bracket on the top loudspeaker module.

Step 4 : Connect interconnect power and audio cables between units.

Step 5: Not illustrated – Secure cables with the included zip ties and fasten with self-tapping screw into extrusion slot near the interconnect bracket. It is recommended to screw the zip ties close to the power cable connection to ensure that the power cable remains secure.

Step 6: Place a washer between the loudspeaker bracket and the wall bracket. Not illustrated – use the included double-sided tape ring to adhere the washer to the loudspeaker bracket around the protruding threads of the flanged head bolt.

Step 7: Hang complete loudspeaker array (1-3 modules) from top bracket. Ensure that the flanged head bolt attached to the loudspeaker bracket is fully inserted into the clearance hole of the wall bracket. Thread a flanged nut onto the bolt and hand-tighten securely but loosely, with the speaker turned 90 degrees.

Step 8:  Attach a wall bracket to the loudspeaker bracket on the bottom unit, using the included flanged head bolts. Place a washer between the loudspeaker bracket and the wall bracket. Not picutred – use the included double-sided tape rings to adhere the washer to the loudspeaker bracket, around the protruding threads of the flanged head bolt.

Tip: Use a level on the loudspeaker array to position the bottom wall bracket on the wall. Mark as needed for wall mounting screws (not included).

Step 9: Mount the wall bracket to the wall, using hardware appropriate for your application.

CAUTION: Ensure the mounting surface and the method of attaching the loudspeaker system to the surface is capable of supporting the total weight of the system. Bose recommends a safety factor of 10:1. Reattach MSA12X to wall brackets, including bottom screw and flanged nut.

Step 10: Not illustrated- Connect field wiring and test loudspeaker operation. It is recommended to keep the loudspeaker assembly in the 90 degree orientation until loudspeaker operation has been tested, to allow easier access the connection panel and indicator lights.

Step 11: Rotate the loudspeaker assembly into the desired position.

Step 12: If installing the loudspeaker perpendicular to the wall, insert flanged head bolts into both holes on the bottom wall bracket, to secure the loudspeaker bracket to the wall bracket. Place washers between the loudspeaker bracket and the wall bracket.

Note: If installing the loudspeaker at an angle that is not perpendicular to the wall, attach the yaw bracket to the loudspeaker and wall bracket to lock the speaker into position. The yaw bracket secures the loudspeaker array into position, in 6° increments (from 12° to 90°). Please see the MSA12X Installation Guide for more details.

Step 13:  Tighten the flanged head bolts and flanged nuts connected to the loudspeaker brackets at the top and bottom of the array, using a torque not to exceed 6.78 N-m (5 ft-lbs).

Clock Outlet

If possible, install a clock (recessed) outlet for a clean, professional appearance.

To plan for center of outlet placement, use wall bracket height + 1/2 outlet/ Junction box height.

For US outlet covers, use 6.5” up from bottom of the array. If you will be connecting external power at the top, then use 6.5″ down from the top of the array.

CONFIGURE

In order to set multiple beam patterns for an MSA12X array and invoke changes from external devices, such as a Bose Professional CC-64 controller, a CC-3D, or ControlSpace Remote, you need a supported Bose Professional ControlSpace processor, such as ControlSpace EX-1280. Then, associate the MSA12X to the ControlSpace processor in CSD. Also through this process you can setup Dante® routing. If you use analog for your audio signal and do not need to set/invoke multiple beam patterns, you can skip this section.

Step 1: Scan the network with and a processor device block appears in the Project View.

Step 2: Double-click the processor device block to go to the device view. Now you see MSA12X devices in the list under Dante Endpoints in the SP Tool Kit. Drag-drop these devices from the SP Tool Kit into the device view. This means that these devices are associated with the processor currently selected.

When you drag-drop the devices from SP Tool Kit, red blocks appear in the Device View. These represent the Dante output blocks for the MSA12X devices. Notice you have two output channels for each MSA12X array. These 2 channels correspond to the two beams when the array is in dual beam mode; Ch1 is for Main Beam, and Ch2 is for Secondary Beam. If the array is in Single beam mode, signal for Ch2 is not radiated from MSA12X array.

Step 3: Add signal processing blocks in the Device view and complete the system. A simple example is provided here.

You can apply different gain/EQ for each beam by feeding signals for output 1 and 2 of each MSA12X array.

Step 4: Go back to the Project View. Now the MSA12X device block indicates the processor that it is associated with.

Note: When MSA12X is associated to a Bose Professional ControlSpace processor, Dante channel subscription from the processor to the MSA12X is executed automatically. The blue background in the image above shows the system online

Adjust input settings to match your system. In the MSA12X control panel, you can:

  • Select input type from Dante or Analog.
  • Select input gain (0 dB / +14 dB / +24 dB).
  • Select Speaker EQ (Music or Voice).

Now you are ready to send beam settings designed in Array Tool to the MSA12X arrays. 

Go to Bose Professional Array Tool. If you haven’t already, design your Array in the Speakers/Analysis tab. Steps can be reviewed at the top of this page under the Design section.

Make sure the number of modules (module count) in the Array Configuration matches that of the physical array.

Step 1: Go to the Beam tab and click the Send to CSD button.

Step 2: In CSD, the Beam Configuration Destination dialog box appears. The arrays that are selectable in this dialog box are the ones with the same number of modules (module count) in CSD. The number in parentheses after the device name indicates the module count. If the module count does not match, you cannot send beam settings to the array. 

You can select multiple devices if needed. This is helpful when you have multiple arrays that require the same beam settings. Now the beam setting has been sent to the array. If you are feeding audio signal to the array, you will be able to hear the beam pattern change. If you do not like the coverage, go back to Array Tool, adjust the parameters and repeat tthis process.

The Beam Gain and Beam EQ can be changed. Beam Gain is for balancing gains between two beams when in Dual Beam mode.

Note: Beam gain cannot be assigned to ControlSpace wall panels, such as CC-64 or ControlSpace Remote. 

Beam EQ is a filter to compensate for the tonal balance change depending on the beam spreading. The Beam EQ curve is calculated in Array Tool for each beam automatically, and sent to CSD. The shape of the curve can also be adjusted.

By clicking the beam gain for each beam, the Beam EQ display is toggled for that beam.

When you are satisfied with the coverage, Beam Gain and Beam EQ, the next step is to store that beam pattern to the array. Unless you store the beam pattern to a Beam Preset, the beam pattern is lost after the power cycle of the array. There are 10 memory banks for each MSA12X array, and you can store up to 10 different beam patterns along with other hardware properties (Beam Preset) to each MSA12X array. Beam Preset is a ‘snapshot’ of the state of the array.

Items below are stored in a Beam Preset:

  • Input type, Input gain
  • Speaker EQ
  • Beam parameters such as Steer Angle, Spread Angle, etc.
  • Comments
  • Beam Gains
  • Beam EQs

Step 1: Click Store button. Store Beam Preset dialog box appears.

Select the preset number that you want to store the current state to. Change the label for that Preset. You can also edit the Comments field (up to 50 characters) with notes for the loaded preset.

Now the current state is stored to the selected Preset. You can see the currently selected preset on the Beam Preset menu (‘Preset 1: Floor and Balcony’ in this case).

Note: If you change any parameter (such as Beam pattern, Beam Gain) from here, the Beam Preset menu becomes blank. This means that the settings have changed, and the current state of the array has not been stored to a Beam Preset.

Once you store a beam preset(s), you can recall that beam preset from the drop‑down list.

Power On State is a Beam Preset that is automatically recalled right after the power cycle of the array. By default, the first stored Beam Preset is assigned to the Power On State. The Power On State is indicated below the Beam Preset menu.

You can change the Power On State to a different Beam Preset.

Step 1: Click Select POS… button.

Step 2: Select Power On State dialog box appears. Select the Beam Preset that you want to assign to the Power On State.

Step 3: Click OK. Now the Power On State has been changed.

Note: If you are using an analog input, you will want to save that as a preset and assign it to the POS otherwise the MSA12X will default to using the Dante input after a power cycle.

Power On State is a Beam Preset that is automatically recalled right after the power cycle of the array. By default, the first stored Beam Preset is assigned to the Power On State. The Power On State is indicated below the Beam Preset menu.

Once you assign Beam Presets for each array, you can recall a Beam Preset by invoking a Parameter set from other ControlSpace control families (such as CC-64, GPIO, Timer in processor, ControlSpace Remote). To do this, you have to assign the Beam Preset to the Parameter set.

Note: You cannot assign each individual parameter of an MSA12X device (such as Beam Gain, Beam EQ) to a Parameter set directly. Only a Beam Preset (which is a ‘snapshot’ of the state of the array) can be assigned to and recalled from a Parameter set.

This operation can be done while Dante is enabled, but cannot be done when CSD is online (blue background), which is a standard CSD programming procedure. You have to go offline before setting Parameter sets.

Step 1: In the MSA12X control panel, recall the Beam Preset for the state that you want to assign to a Parameter set.

Step 2: Go to the device view of the processor that the MSA12X device is associated with, and select the output block that represents the MSA12X device.

Step 3: Drag that output block into the parameter set tree in the Parameter Set window. Rename the parameter set if needed.

Step 4: Select Properties window appears. Choose Endpoint properties. Click OK.

Step 5: Now the Beam Preset has been assigned to the Parameter set.

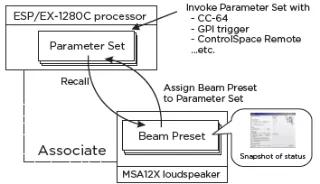
Step 1: Save all configuration files from Bose Professional Array Tool and CSD. Keep these files for later use and adjustment

Step 2: Play program audio through the newly installed MSA12X system. Play it at a normal listening volume. This can be achieved by routing your Dante audio stream with Dante Controller or connecting and routing a source using your Bose Professional DSP.

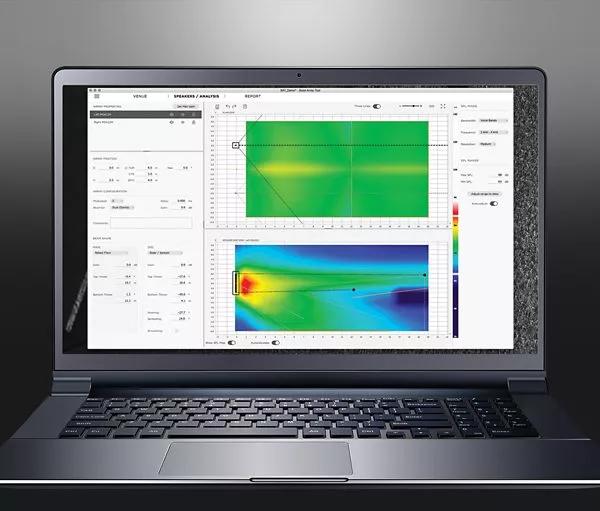
Step 3: Walk around the space to make sure that the audio experience you’ve created in Array Tool matches what you hear in the real world. Take notes of any adjustments that need to be made in Array Tool or the DSP.

Step 4: If you have multiple presets saved for the space, change to your next preset and repeat step 3. Take notes of any changes that need to be made to this preset and repeat for any additional saved presets.

Step 5: Adjust the beams in Array tool and resave your presets as necessary. Walk the space again and repeat steps 3 and 4 until you are satisfied with the performance of the system.

Step 6: Save all final configuration files in both Array Tool and CSD. Keep these files for later use.

Step 7: If additional measurement and tuning is needed, please perform these actions in accordance with your organizations policies and proceedures.